
NOTE: This was originally written in part for a college English assignment. Its intended mainly for use with the TAP program to give beginning object designers a place on their own.
Renderware, often referred to as .rwx, is primarily a text-based language, which makes designing objects with it difficult. There are converters available from other formats such as .cob and .3ds, but personally, I’d recommend learning the basics of the native language since you’ll more than likely end up "tweaking" every file by hand. Although this tutorial should be sufficient for most purposes, if you’re interested in delving more in-depth into the language, you’ll want to look for "Learn 3D Programming for the PC" by Richard F. Ferraro, ISBN 0-201-48332-7, 1996 by Addison-Wesly Publishing.
First things first: What is Renderware and what do I need?
Renderware uses a corner/side/texture system to render objects. It takes a series of points in space, and connects these "corners" to create sides. Once a side is declared, textures or colors can be painted on them to give you the rainbow of objects you have seen in Active Worlds.
If you can run Active Worlds on your PC, you probably already have all the tools you need! You will to need a text-editor, like Windows Notepad to edit your object, and some scratch paper and a pencil. To see your object, you can just upload it directly to your world ftp site. But it is often a lot easier to use a renderware viewer. You can download RWXMod from the Active Worlds web site, or RWPaint from Criterion’s web site.
The format you use as you begin typing doesn’t matter. You can use any amount of tabs and spaces to indent your file, and may want to use your own standard to make editing easier. Remember renderware is also case-insensitive so it doesn’t matter whether you use capitols or lower-case. For the purposes of this tutorial I’ll use standard capitalization to denote terms and Italics to denote numbers you’ll enter values for.
I’ve figured that much on my
own, start explaining already! Where do I start?
Every renderware file has a few lines in common. The first pair of lines simply declares that this is a renderware file.
You will need to put an opening ModelBegin and a closing ModelEndinto every object your make. Thus, your first file so far is:
ModelBegin
ModelEnd
Another necessary pair of lines declares that there is to declare where the geometry is. You will need to add ClumpBegin and ClumpEnd statements, which will normally be nested right inside the ModelBegin and ModelEnd. Thus your skeleton file is now:
ModelBegin
  ClumpBegin
  ClumpEnd
ModelEnd
Now onto Cartesian coordinates: Declaring Corners.
 Renderware uses a Cartesian coordinate system to declare where each point, or Vertex, is located. This is basically the same graphing system we all learned in high school. You may want to pull out some graphing paper to sketch on; drawing on graph paper is one of the best ways to visualize 3D models. If you don’t have any graph paper, plain white paper from your printer will work just as well.
Rather than thinking about a vertex as a point, you may find it easier to visualize it as a corner. Look at any object and try to find all the corners, both inside and outside corners. Each would need a Vertex statement if it were made in 3D. Smooth, cornerless, transitions, such as a lampshade, would need to be approximated as a lot of corners close together, each of which needs its own Vertex statement.
You need to give each Vertex statement three values:
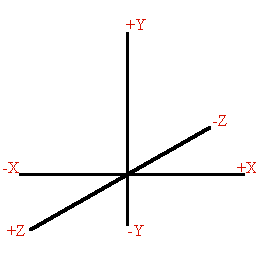
Vertex X Y Z
As in the drawing figure above, X runs left and right, Y up and down and Z into and out of the paper. In Active Worlds, 1 unit is equal to one grid unit, or 10 meters. Likewise, 0.1 is 1 meter. For example, Vertex 0 0 0 is at the origin and Vertex –0.05 0 0 is half a meter to the left. The origin may be thought of as the center of rotation, and is the reference point from which we give each vertex its numbers. In Active Worlds, the origin is the bottom of the object in the Z-axis, but the center of the X and Y-axis. So when you make your first box, remember that this "0 0 0" point will be on bottom and the rotational center of your object.
Now is also a good time to learn how to make internal comments. Renderware uses the pound sign, #, to denote a comment. Everything after a # is ignored, so you can use this to include comments, such as the ordinal number a vertex is.
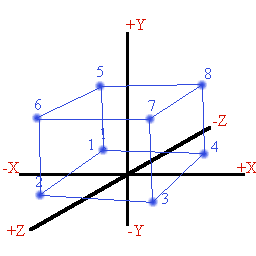
You now need to declare where each corner is. A box is a simple example to begin with, since it is easy to draw for reference and each vertex will have nice, round numbers. You will need to declare the eight points of a one meter box, with corners at +/- ½m points, and sitting on the ground. Remember that 0.1 is one meter, and 0.05 is ½ meter. Your file will read:
ModelBegin
  ClumpBegin
    Vertex  -0.05  0.00  -0.05 #1
    Vertex  -0.05  0.00   0.05 #2
    Vertex   0.05  0.00   0.05 #3
    Vertex   0.05  0.00  -0.05 #4
    Vertex  -0.05  0.10  -0.05 #5
    Vertex  -0.05  0.10   0.05 #6
    Vertex   0.05  0.10   0.05 #7
    Vertex   0.05  0.10  -0.05 #8
  ClumpEnd
ModelEnd
How can I see my box? Declaring Sides
Right now your box is just a pointcloud, that is, a collection of loose points without any "sides", or polygons as we call them. There are three types of polygons, each accomplishing the goal of telling Active Worlds where to draw a side. The three types are Triangle, which connects three corners, Quad, which connects four, and Polygon, which can connect any number of points.
Triangle V1 V2 V3
Quad V1 V2 V3 V4
Polygon n V1 V2 V3 … Vn
Triangle and Quad have three and four vertex numbers, respectively. If you remember back to when we were declaring corners, the chronological number each Vertex is listed in, is the number we refer to it as. If this seems at all confusing, just use # we typed after each Vertex. The first vertex in a clump is Vertex X Y Z #1, the second Vertex X Y Z #2 and so on.
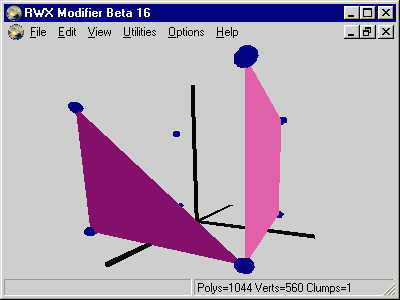
While the Vertex you refer to first doesn’t matter, the order determines which direction it faces, since renderware polygons only face in one direction. Looking straight at the polygon you want the points need to be listed in counter-clockwise fashion.
"Triangle 2 3 6", "Triangle 3 6 2", and "Triangle 6 2 3" are identical as far as Active Worlds in concerned. But listing the numbers clockwise, such as "Triangle 3 2 6," would make the side invisible from the front, and only visible from the back. This is where a 3D sketch on your scratch paper comes in handy!
Therefore, if we would add the following lines to our file we would see:
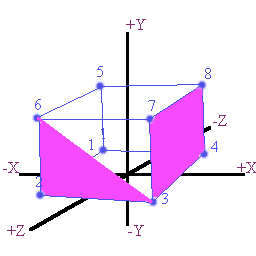
Triangle 2 3 6
Quad 3 4 8 7
ModelBegin
  ClumpBegin
    Vertex  -0.05  0.00  -0.05 #1
    Vertex  -0.05  0.00   0.05 #2
    Vertex   0.05  0.00   0.05 #3
    Vertex   0.05  0.00  -0.05 #4
    Vertex  -0.05  0.10  -0.05 #5
    Vertex  -0.05  0.10   0.05 #6
    Vertex   0.05  0.10   0.05 #7
    Vertex   0.05  0.10  -0.05 #8
    Triangle 2 3 6
    Quad 3 4 8 7
  ClumpEnd
ModelEnd
You can see that the triangle statement created a triangle between the points 2, 3 and 6, and the Quad statement connected the four points 3, 4, 8 and 7. Also at this point you can finally see this file in a RenderWare viewer such as RWXMod, or RWPaint.
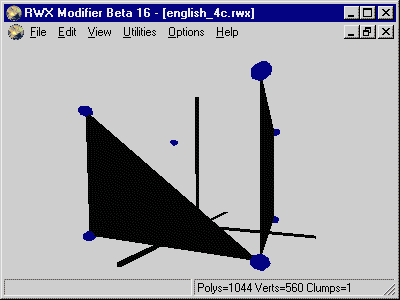
Notice you won’t actually see the axes or points, only the Triangle and Quad. They are added for easier visualization and demonstration for this tutorial, but the methods used to create them are a bit more advanced.
Looks nice, but why is it black?
The default settings for renderware are flat black, with no reflections at all. You will need to declare surface colors and reflective properties to make your sides look like other objects in Active Worlds. You can give your object color properties by adding two lines into your file:
Surface ambient diffuse specular
Color red green blue
The Surface statement has three values. Ambient is the amount of constant lighting on the object, no matter what orientation. Diffuse lighting lights the side towards the light source more than the other side. Specular works much like diffuse, but in a much stronger way, almost like glare. For our example, we’ll use a 0.4 ambient, 0.5 diffuse and 0.1 specular.
The Color statement specifies an "RGB" or red-green-blue value on a scale from 0-to-1. Most paint programs represent this color on a 256-shade scale, and so can be converted to a % based scale by dividing by 255. This example has a reddish purple color of %100 red, %10 green and %80 blue, or 1 .1 .8.
All modifiers, such as Surface and Color, need to be placed before the Polygon statements they apply to.
ModelBegin
  ClumpBegin
    Vertex  -0.05  0.00  -0.05 #1
    Vertex  -0.05  0.00   0.05 #2
    Vertex   0.05  0.00   0.05 #3
    Vertex   0.05  0.00  -0.05 #4
    Vertex  -0.05  0.10  -0.05 #5
    Vertex  -0.05  0.10   0.05 #6
    Vertex   0.05  0.10   0.05 #7
    Vertex   0.05  0.10  -0.05 #8
    Surface .4 .5 .1
    Color 1 .1 .8
    Triangle 2 3 6
    Quad 3 4 8 7
  ClumpEnd
ModelEnd
But weren’t we making a box? Declaring useful polygons to enclose an object.
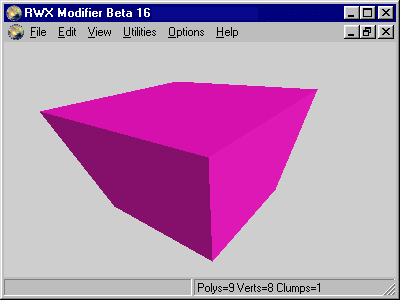
At this point, we have covered all the basic commands you need to make any sort of shape you can imagine. You know how to tell the computer where each corner is, and how to connect corners to make a side. But for now, we can close the holes we haven’t closed yet, and finish this example. The easy way would be to make six Quad statements, one for each side. But this is a tutorial, so we’ll instead substitute Triangles for one side and a Polygon on another.
Quad 3 4 8 7        #We started with this when we introduced polygons
Triangle 2 3 6      #We started with this when we introduced polygons
Triangle 3 7 6      #This covers the triangular-shaped hole above the other triangle.
Quad 1 2 6 5
Quad 1 5 8 4
Quad 4 3 2 1
Polygon 4 5 6 7 8   #Notice, "4" is the # of points, and "5 6 7 8" are the points.
Thus, our completed first example will look like this. Notice that the triangles on the lower left, the quad on the lower right, and the polygon on top all look identical. This is because they are all three defining identical 4-cornered sides. (NOTE: The screen shot looks distorted from the perspective of the viewpoint, a trick programmers and artists use to make things look more 3-dimensional. Viewed in a 3D environment, it appears to be a perfect a cube.)
ModelBegin
  ClumpBegin
    Vertex –0.05  0.00  -0.05 #1
    Vertex –0.05  0.00   0.05 #2
    Vertex   0.05  0.00   0.05 #3
    Vertex   0.05  0.00  -0.05 #4
    Vertex –0.05  0.10  -0.05 #5
    Vertex –0.05  0.10   0.05 #6
    Vertex   0.05  0.10   0.05 #7
    Vertex   0.05  0.10  -0.05 #8
    Surface .4 .5 .1
    Color 1 .1 .8
    Triangle 2 3 6
    Quad 3 4 8 7
    Quad 3 4 8 7
    Triangle 2 3 6
    Triangle 3 7 6
    Quad 1 2 6 5
    Quad 1 5 8 4
    Quad 4 3 2 1
    Polygon 4 5 6 7 8
  ClumpEnd
ModelEnd
Is this the end already? How do I make something interesting?
All objects in active worlds, no matter how complex, use only these basic commands. Although for the example here we used nice square numbers, you can use any odd Vertex coordinates and any number of Vertexes to make whatever shape you need. You may not know how to do complicated texture maps or advanced prototyping techniques, but you can build anything you can think of with what you now know.
For further online help on Renderware, I'd suggest HenrikG's Texture Tutorial and RenderWare 2.1 Script Reference. Henrik does a great job of explaining texture mapping, and its hard to get away from the vast syntax list compiled by the creators of Renderware.
For more information, you can visit the following sites:
since December 1, 1997