In this part I will go into more complex polygons.
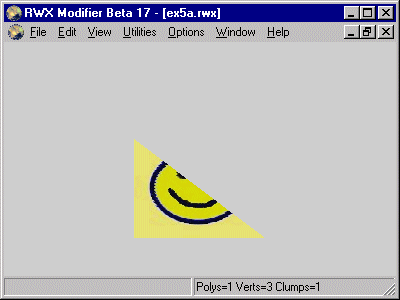
This example is really the same as example one but we have removed the upper right vertex and formed a triangle polygon from the remaining vertices. The file looks like this:
ModelBegin
surface .5 .3 0

ClumpBegin
   Vertex -.2  0 0 uv 0 1 #1
   Vertex  .2  0 0 uv 1 1 #2
   Vertex -.2 .4 0 uv 0 0 #3
   color 1 1 0

   Texturemodes lit foreshorten

   Texture smile

   Triangle 1 2 3

ClumpEnd

ModelEnd
Note: The rules for applying UV values is exactly the same as before.
The model looks like this:
Now we will add 2 vertices to this object, we reintroduce the upper right corner but put it even higher, at 8 meters above ground (twice the height as before). In addition we put in a vertex in the very centre of the original example1 object.
This will form a 5 sided polygon. We have the commands Triangle and Quad to form 3-sided and 4-sided polygons but for higher order polygons there is a generic command called Polygon. Its used like this:
Polygon vcount v1 v2 .... vn
vcount is the number of sides in the polygon and v1, v2 etc is
each vertex listed as we shape the polygon.
You see the use in this example file:
ModelBegin
surface .5 .3 0

ClumpBegin
   Vertex -.2  0 0 uv 0  2   #1
   Vertex  .2  0 0 uv 1  2   #2
   Vertex  .2 .8 0 uv 1  0   #3
   Vertex   0 .2 0 uv .5 1.5 #4
   Vertex -.2 .4 0 uv 0  1   #5

   color 1 1 0

   Texturemodes lit foreshorten

   Texture smile

   Polygon 5 1 2 3 4 5

ClumpEnd

ModelEnd
This object will look like this:
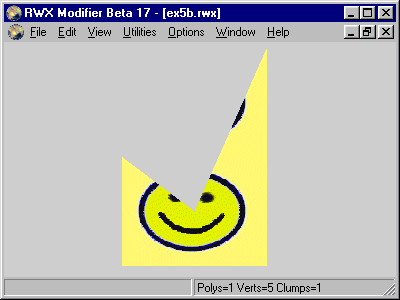
In this instance we have a vertex above the old highest vertex so we start the mapping at this new highest point. UV 0 0 isn't actually used because there is no vertex there but you can imagine it being there. Here is a illustration how this is done:

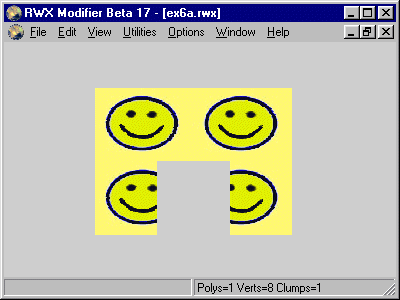
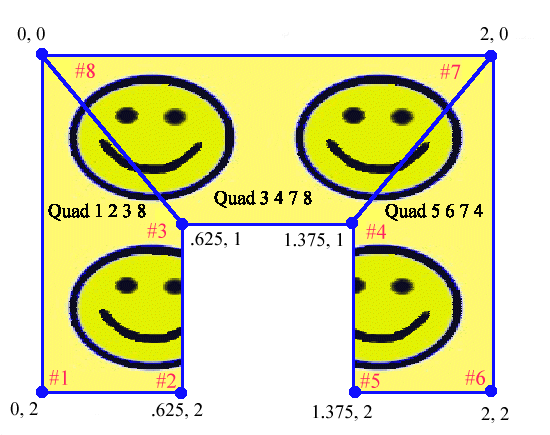
This example is again a 4 meter wide, 4 meter tall panel. In addition it has a cut-out for a door which makes it a more complex surface to map our texture in. We use one tile per 2 meters here.
The file looks like this:
ModelBegin
surface .5 .3 0

ClumpBegin
   Vertex -.2   0  0 uv 0     2 #1
   Vertex -.075 0  0 uv .625  2 #2
   Vertex -.075 .2 0 uv .625  1 #3
   Vertex  .075 .2 0 uv 1.375 1 #4
   Vertex  .075 0  0 uv 1.375 2 #5
   Vertex  .2   0  0 uv 2     2 #6
   Vertex  .2   .4 0 uv 2     0 #7
   Vertex -.2   .4 0 uv 0     0 #8

   color 1 1 0

   Texturemodes lit foreshorten

   Texture smile

   Polygon 8 1 2 3 4 5 6 7 8

ClumpEnd

ModelEnd
And the model looks like this
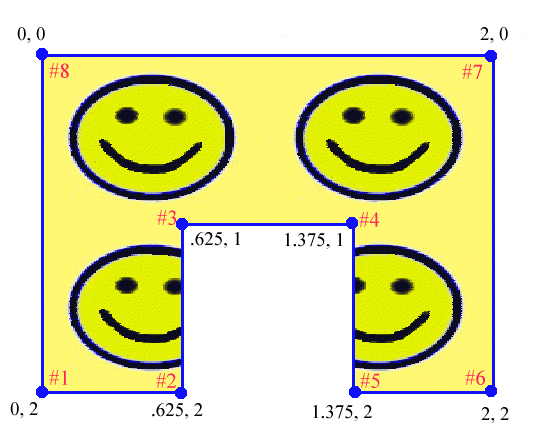
The vertices 2 - 5 is the 4 points forming the door itself. The door is 1.5 meters wide and 2 meters high. What may confuse people is the UV settings at these points. We have in this objects defined that we want one tile for every 2 meters. That means we have to calculate the UV values at each point.
Lets look at vertex #2: It is -.075 meters from the centre of the object but what we need to know is the distance from our mapping origo (UV 0 0). The distance from the left side (which has U value 0) is 1.25 meters. That means that the U value for will be:
U = 1.25 / 2 = 0.625 (we divide by 2 since we have one tile per 2 meters)
Vertex #5 is 2.75 meters from from the left side and the calculation is like this:
U = 2.75 / 2 = 1.375
To illustrate this object further, take a look at this drawing:
There is an alternative to using one complex polygon here, we can break up the surface to 3 Quads like this:
   Quad 1 2 3 8
   Quad 3 4 7 8
   Quad 5 6 7 4
The object will look exactly the same as before. An illustration of these Quads (the blue lines illustrate the Quads):
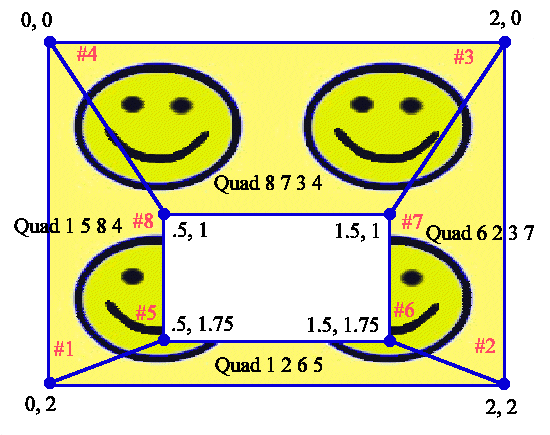
Now we will take one step further and make a panel with a window. The panel is the same as before: 4 meters wide and tall. The window is 2 meters wide and 1.5 meters tall and starts 0.5 above the ground.
surface .5 .3 0

ClumpBegin
   Vertex -.2  0  0 uv 0   2    #1
   Vertex  .2  0  0 uv 2   2    #2
   Vertex  .2 .4  0 uv 2   0    #3
   Vertex -.2 .4  0 uv 0   0    #4

   Vertex -.1 .05 0 uv .5  1.75 #5
   Vertex  .1 .05 0 uv 1.5 1.75 #6
   Vertex  .1 .2  0 uv 1.5 1    #7
   Vertex -.1 .2  0 uv .5  1    #8

   color 1 1 0

   Texturemodes lit foreshorten

   Texture smile

   Quad 1 5 8 4
   Quad 1 2 6 5
   Quad 6 2 3 7
   Quad 8 7 3 4

ClumpEnd

ModelEnd
This is how it looks:
Vertex 1 - 4 form the outer corners and vertex 5 - 8 form the window. In this example 4 Quads form the complete surface in this way:
Polygon 10 1 2 3 4 1 5 8 7 6 5
This can be illustrated like this:
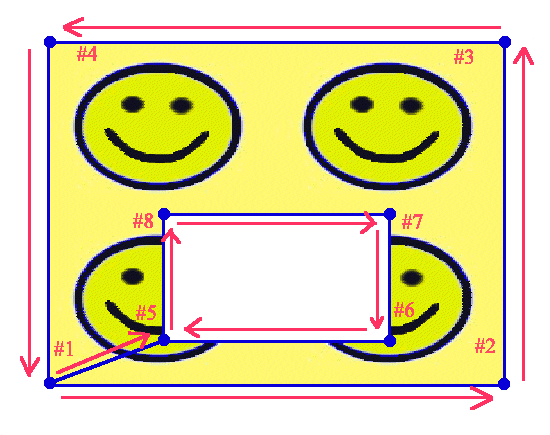
The staring point of the polygon and the arrows show how the polygon is shaped.