Knowing the terminology (terms) and language of something makes understanding it easierusually, anyway. I have included references to Criterion's RenderWare API Reference in the definitions, along with my interpretations. If the definitions do not make sense, explore the links within them. I've tried to explain things to a certain degree, but I can only do so much explaining before it gets ridiculous. If you're having trouble, search for more information on the Net. Good sites I've found are:
Another thing you can do is access the Active Worlds worldbuilders newsgroup and ask questions there. Lastly, you can email me and ask to explain something further--but only email me after you've exhausted the contents of this site and its links.
Note: please don't override this page's colors with your web browser's colors, as this page's colors are used to aid in illustration of terms.
Terms/script commands format/syntax:
term/script command: [(alternate name(s)if any)]
The command syntax/argument(s) is/are how the command is actually written (syntax) in the script. Some terms/commands will have subterms/subcommands, some terms are the commands, and some terms are just terms. It may be confusing at first but just keep exploring the links and it should sink in eventually.
Roland has added the complete "RWX Command Reference" (no direct link) to AW3+'s help, so be sure to read it as well in case there are discrepancies (which I've tried to mention on the site but there may be some I missed).
| 3D Terms & RenderWare Script Commands |
|---|
model [3D "object"/"script"/RenderWare script (RWX) file]: A collection of clumps.
Note: Even though it says "every script file should have exactly one top-level ModelBegin ... ModelEnd block", if a script file does not have any heirachial/parent-child/nested clumps or prototypes, the modelbegin/modelend statements are unnecessary (and completely optional in AW3+, but for backward compatibility with AW 2.2 follow the above guidelines).
clump
clumpbegin: Begins clump; used after a modelbegin statement.
Note: Nested clumps can be used to make part of an object non-solid.
# ("pound" sign, "number" symbol):
Note
vertex # # # uv # # prelight # # #: where the first # is the x-coordinate, the second # is the y-coordinate, and the third # is the z-coordinate. uv and prelight coordinates are optional.
vertex # # # uv # #: Where the first # after uv is the horizontal distance across the texture and the second # after uv is the vertical distance across the texture.
See editors/viewers for programs to make color selection easier.
Note:
polygon ("poly"/face/facet/side): More than one vertex (usually more than 4 when used in a RenderWare script file) connected together to form a polygon.
quad (quadrilateral): A 4-vertex polygon (i.e. a square or rectangle)
triangle: A 3-vertex polygon ("tri" would probably be a better name to be consistent with "quad").
Note: If polygon and/or quad commands are used in AW3+, since RW3 no longer supports non-triangle polygons, it (and AW3+) will tessellate polygon and quad commands into, essentially, "triangle" commands. This can cause some polygons to become distorted (not flat/smooth: primitives: Simple ("primitive") premade shapes used to make modelling a little easier.
block: A six-sided cube (flat, equal-sided, or elongated) centered on the origin (where the axes meet).
material
Note: materialmode double will only make one side of a polygon solid. "addmaterialmode" and "removematerialmode" can also be used but aren't necessary (and waste bytes) since there are only two materialmode commands: "double" and "null", unlike texturemode's 3 commands. geometrysampling: How polygons are rendered.
Note: Wireframe polygons are always fully prelit (AW3+) and no matter what their surface don't reflect light; they also don't break up, fragment, and remain consistently visibly solid at long (+20m) distances unlike solid polygons.
lightsampling: how light is displayed across polygons
lightsampling vertex
Note:
color: specifies colors of polygons
See editors/viewers for programs to make color selection easier.
ambient #: Where # is from 0 (default; no ambienceblack) to 1 (full ambiencewhite)
diffuse (diffusion): Shaded (diffused) light from light source(s), causing effects ranging from a flat/matte finish to a smooth gradient (if lightsampling vertex is enabled).
diffuse #: Where # is from 0 (default; no diffusion) to 1 (full diffusion).
specular (specularity): Highlight/glare/glossiness/shininess from light source(s).
specular #: Where # is from 0 (default; no specularity) to 1 (full specularity).
Note:
opacity (visibility/invisibility, transparency/see-throughness):
Note:
texture
clumpend: Ends clump; used before a modelend statement.
 coordinate
x-axis/coordinate: horizontal/width/left-to-right
y-axis/coordinate: vertical/height/up-and-down
z-axis/coordinate: depth/front-to-back
vertex ("vert", vertices/"verts"):
UV
Note: Even though it says the range of the UV coordinates is from 0 to 32, I have used 180 on a ground object and more than 32 on chainlink fences. Some viewers (RWXMod and RWXLook, specifically) won't render an object if the UV coordinates are more than 32, but once inside Active Worlds, objects render fine. I think the limit is around 360 in Active Worlds, though, but I'm not sure. If anyone finds out, email me. kf: "I have made grounds with UV values up to 600, which work very well. Such high values are needed when, for example, you have a non-repeating formed ground in a large world to prevent the ground ending before the maximum sight (1200m) ends."
prelight: Light (currently the world's ambient light color) is calculated starting from this color.
vertex # # # uv # # # prelight # # #: Where the #s after prelight are from zero (0) to one (1) in the RGB (red-green-blue) color system:
0 0 0 = black (default): same as world ambient color
1 0 0 = red
0 1 0 = green
0 0 1 = blue
.5 .5 .5 = grey
1 1 1 = white
etc.
polygon # # # # # (tag <tag>)...: where the first # is the total number of vertices this polygon statement will connect, the second # is the first vertex, the third # is the second vertex, the fourth # is the third vertex, the fifth # is the fourth vertex, and so on
quad # # # # (tag <tag>): Where the first # is the first vertex, the second # is the second vertex, the third # is the third vertex, and the fourth # is the fourth vertex
triangle # # # (tag <tag>): Where the first # is the first vertex, the second # is the second vertex, and the third # is the third vertex.
![]() /
/![]() ) that otherwise look fine
) that otherwise look fine ![]() outside of AW (older viewers, etc). The solution is to create the triangle polygons manually.
outside of AW (older viewers, etc). The solution is to create the triangle polygons manually.
Stephan Vogt (edited): "Polygons will render perfectly when the surface is a plane aligned to any of the primary axes but if the surface is curved, and most importantly, passes through the origin, distortion will result."
block # # #: width, height, depth
Note: If a negative value is given for any one, two, or all three of (a) block argument(s), polygons forming the block will be reversed.
disc: A filled circle centered on the y-axis. These can be used to cap the ends of cylinders and cones, but be sure to use the same number of sides or gaps will appear.
disc # # #: height, radius (x-z plane), number of sides (in whole numbers from 0: triangle to whatever: circle)
hemisphere: A hollow pyramid to a cap/bowl/dome, centered on the base. These can be used to cap the ends of cylinders and cones, but be sure to use the same number of sides or gaps will appear (see note).
hemisphere # #: radius (x-z plane), polygon density (in whole numbers from 0: pyramid to whatever: cap/bowl/dome):
1: pyramid (4 sides/polygons)
2: 8 sides, 16 polygons
higher: cap/bowl/dome (rounder/smoother)
sphere: A cube to a ball, centered on the origin.
sphere # #: radius (x-z plane), polygon density (in whole numbers:
0: cube (6 sides/quad polygons)
1: diamond (8 sides, 32 quad polygons)
higher: ball/sphere (rounder/smoother)
Note:
materialmode/addmaterialmode/removematerialmode: Sets overall material characteristics. In AW this is just whether or not polygons are single- or double-sided.
materialmode null: Removes material; default.
materialmode double: Renders polygons double-sided.
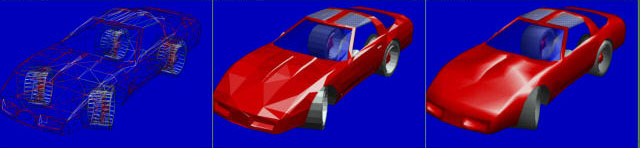
geometrysampling pointcloud: Vertices; unsupported in AW3+.
geometrysampling wireframe: Edges or lined/connected vertices; unfilled.
geometrysampling solid: Filled; default.
or
lightsampling facet or vertex
lightsampling facet
color # # #: where #s are from zero (0) to one (1) in the RGB (red-green-blue) color system:
0 0 0 = black (default)
1 0 0 = red
0 1 0 = green
0 0 1 = blue
.5 .5 .5 = grey
1 1 1 = white
etc.
surface
surface # # #: Where the first # is ambience, the second # is diffusion, and the third # is specularity:
ambient (ambience):
RW 2.1 uses dithering (faster, lower quality) in software and alpha blending (slower, better quality) in hardware (through MMX or Direct3D drivers) to achieve opacity; RW3+ uses alpha blending only.
opacity #: Where # is from 0 (no opacity) to 1 (default; full opacity); in between, .25 and .75 are the next consistently dithered opacities, followed by .38 and .63, then .14 and .87.
Princess Tia's MMX Bug page for more info.
texture mapping: Applying UV coordinates to vertices in order to place textures on an object.
texturemode/texturemodes/addtexturemode/removetexturemode
prototype
protoend: ends prototype
protoinstance <name>: Where <name> is the prototype name as defined in protobegin <name>; calls prototype; placed after a clumpbegin
protoinstancegeometry <name>: Same as protoinstance except the materials are not used. This is useful for just the verts/polys.
Note:
transform (transformation):
transform # # # # # # # # # # # # # # # #:
Note: I am not 100% certain of the placement of transform commands, but I think everything is correct except the specifics of the rotate commands. Andras explains transformation better, and Just In has some images (transform, rotate) that illustrate it. Note how the rotations aren't really rotations at all but skews! So much for doing transform "rotations" using the rotate command. Oh well...
transformbegin: begins transform
transformjoint: Allows limb/joint movement, specifically in avatars, but can also be used to pivot polygons or clumps of polygons (doors, handles, knobs, buttons). In Active Worlds, SEQs are used in avatars (although hopefully one day in non-avatars too) to take advantage of limb/joint movement, or transformjoint commands.
Note: So much for non-avatar object pivoting support. Transformjoint is unsupported in AW3+.
rotate (rotation): Moves polygon(s)/clump(s)
around (an) axis/axes.
scale (scaling): Enlarges or shrinks polygon(s)/clump(s).
tag
Note:
axisalignment (sprite/facer/decal):
axisalignment zorienty: The clump's local Z axis is aligned with the Look At vector of the camera, but the orientation of the 2D projection of the clump's local Y axis is preserved.
axisalignment xyz: The clump is not axis aligned, it is unconstrained.
axisalignment noaxisalignment: Do not align the clump with the viewing camera.
Note: AW3+ axisalignment is handled differently and is no longer all axes like in RW 2.1. Because Criterion did not provide backward compatibility for sprites, Roland had to add them to AW3 but did not add full axis alignment (which I hope he adds an option for soon).
collision: Enables/disables collision detection (solidity).
Note: This command only works inside clumps (and it either collides as a whole or doesn't, unlike before AW3) and can also be used to make only specific polygons non-solid.
hints: Enable RenderWare to render a scene containing that clump more efficiently; hint arguments can be linked together.
<hint> is one of the following hints:
hs: Action should be taken to prevent hidden surfaces from being visible when the clump is rendered
Note:
includes: Reference (link to) another model into the current model without having to have the other entire model's code in the current model.
Note:
z-buffer(ing): See nVidia's, Webopedia's, and Wikipedia's z-buffer(ing) definitions.
default: Automatically assumed without declaring/stating/specifying otherwise; command does not need to be included in script.lit
textureaddressmode wrap, mirror, or clamp
Note:
AW3+ texture edgeline problem ![]() (local copy) when using this command and for single texture tiling problems in general.
(local copy) when using this command and for single texture tiling problems in general.
texturemipmapstate on or off: turn mipmapping on or off
protobegin <name>: Where <name> is whatever name you want to call the prototype; begins prototype
transform <scale x> <rotate #> <rotate #> 0 <rotate #> <scale y> <rotate #> 0 <rotate #> <rotate #> <scale z> 0 <translate x> <translate y> <translate z> 1
scale x
rotate
rotate
0
rotate
scale y
rotate
0
rotate
rotate
scale z
0
translate x
translate y
translate z
1
transformend: ends transform
transformjoint # # # # # # # # # # # # # # # #:
transformjoint <scale x> <rotate #> <rotate #> 0 <rotate #> <scale y> <rotate
#> 0 <rotate #> <rotate #> <scale z> 0 <translate x> <translate y> <translate z> 1
translate (translation): Moves/offsets/shifts polygon(s)/clump(s) linearally along an axis/axes.
translate # # #: Where the first # is the x-coordinate (horizontal/width/left-to-right) distance to be translated, the second # is the y-coordinate (vertical/height/up-and-down) distance to be translated, and the third # is the z-coordinate (depth/front-to-back) distance to be translated
rotate # # # #: Where the first # is the x-coordinate (horizontal/width/left-to-right), the second # is the y-coordinate (vertical/height/up-and-down), and the third # is the z-coordinate (depth/front-to-back); the last # is the degree of the rotation.
scale # # #: Where the first # is the x-coordinate (horizontal/width/left-to-right) amount to be scaled, the second # is the y-coordinate (vertical/height/up-and-down) amount to be scaled, and the third # is the z-coordinate (depth/front-to-back) amount to be scaled
Note:
tag <tag>: Where <tag> is a positive whole number
avatar tags
tag 100: sign
tag 200: picture
axisalignment zorientx: The clump's local Z axis is aligned with the Look At vector of the camera, but the orientation of the 2D projection of the clump's local X axis is preserved.
collision on or off
hint <hint>: one hint
hints <hint> <hint>: multiple hints
addhint <hint>: add one hint to current hints
removehint <hint>: remove one hint from current hints
container: The clump spatially contains other clumps.
editable
Note:
include: Inserts copies of the polygons and vertices of clump into the current clump under construction. The source polygons and vertices are transformed by the CTM before being added. The materials of the source polygons are copied to the new polygons.
(I've only found Modeler to, actually).
include <file.rwx>
includegeometry <file.rwx>
Script Command Defaults
null: nothing/void; no value
* AW3+ only (but include for AW 2.2 backwards compatibility)
Command Value
ambient 0
diffuse 0
specular 0
lightsampling facet
geometrysampling solid
color 0 0 0 (black)
opacity 1
tag 0
texture null
texturemipmapstate on*
texturemode lit, filter*, foreshorten*
materialmode null
![]() Introduction |
Introduction |
![]() News/Updates |
News/Updates |
![]() Files |
Files |
![]() Measurement |
Measurement |
![]() Terminology/Script Commands
Terminology/Script Commands
![]() RenderWare Scripting (RWX) |
RenderWare Scripting (RWX) |
![]() Avatars |
Avatars |
![]() Links |
Links |
![]() Site Index |
Site Index |
![]() Search
Search